
PowerBios
WMI Bios Utility for Lenovo

WMI Bios Utility for Lenovo
PowerBios is a Windows utility that allows you to read, export and change BIOS settings on Lenovo professional devices including
![]() ,
,
![]() and
and
![]() .
.
Using the Windows WMI interface, PowerBios connects to a local or remote computer to read the current BIOS configuration, modify any setting, and generate ready-to-deploy PowerShell scripts.
PowerBios is developed by SomeTools and is available both as a standalone application and through the Microsoft Store.
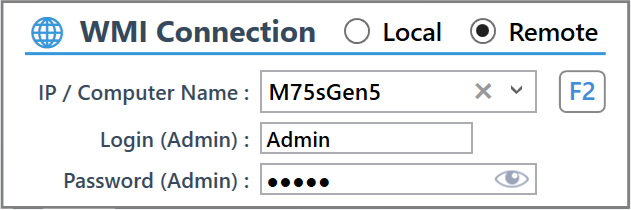
To read or write BIOS settings, PowerBios needs a WMI connection to the target computer.
● Local connection: An administrator account on the local machine is sufficient. No credentials are required.
● Remote connection: You must provide the IP address or computer name, along with a local administrator username and password on the target machine. If both computers are on the same domain, Windows handles authentication automatically and no password entry is needed.
Each successful remote connection is saved locally, so previously used computers are quickly accessible for future sessions.
WMI Remote Access must be enabled on the target computer. A dedicated guide is available at sometools.eu/enable-remote-wmi/
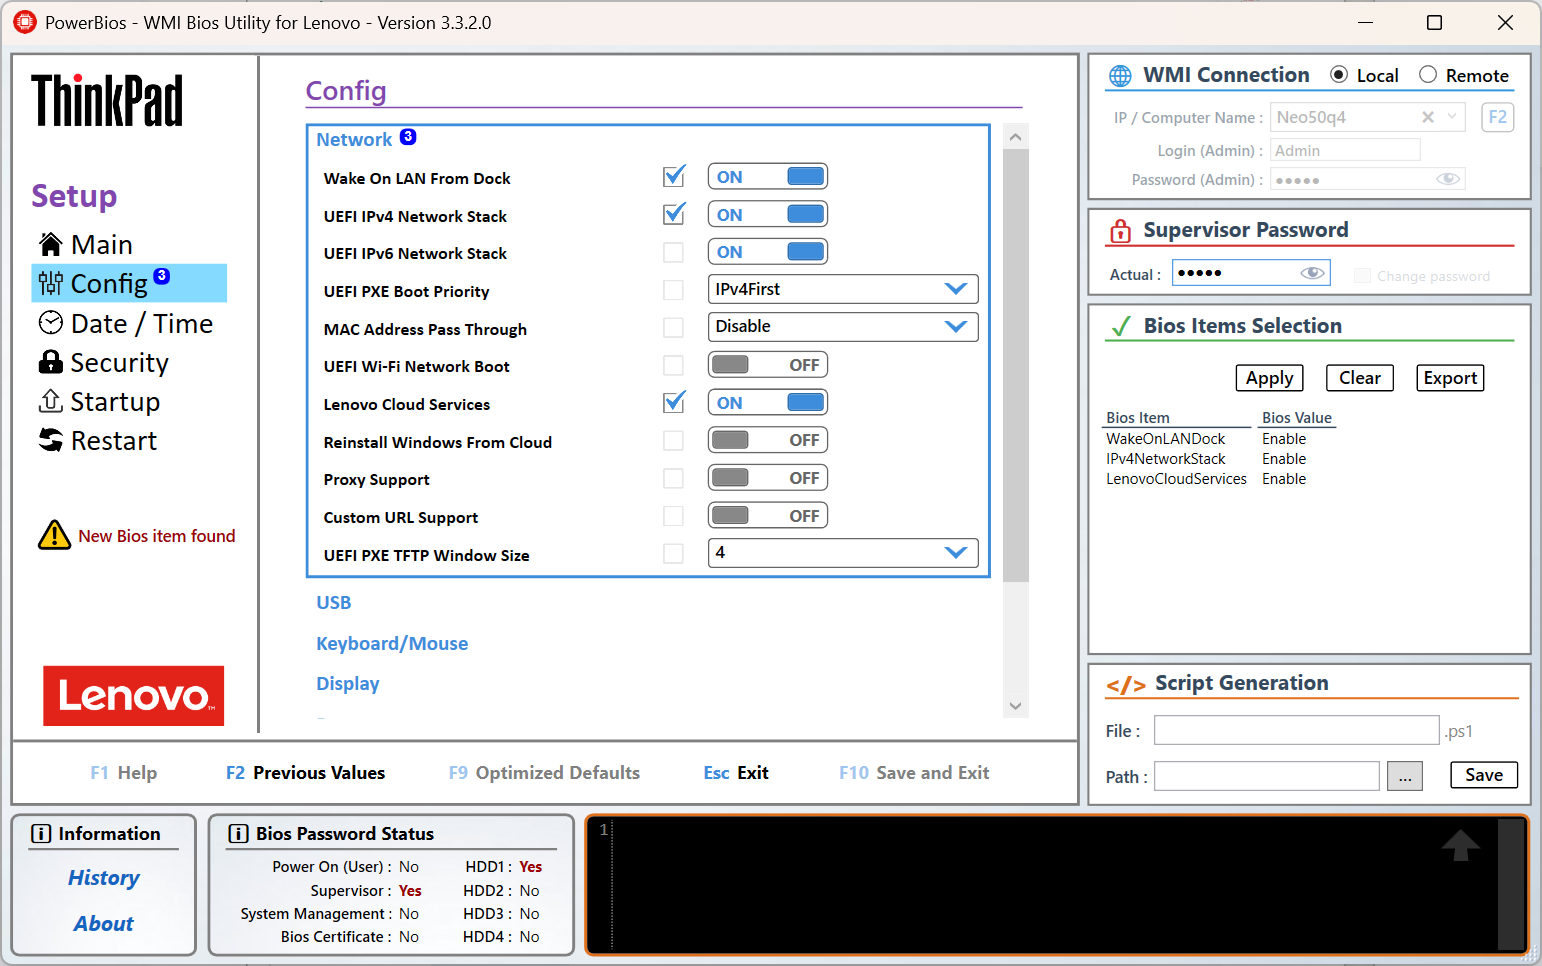
When PowerBios launches, press F2 or click the F2 Previous Values button to connect and load the target machine information. The interface is then organized in three areas.
Left panel - Navigation
The left panel displays the logo of the detected Lenovo device (ThinkPad, ThinkCentre or ThinkStation) and the BIOS section menu with according items. A warning indicator may appears at the bottom when unknown BIOS items are detected.
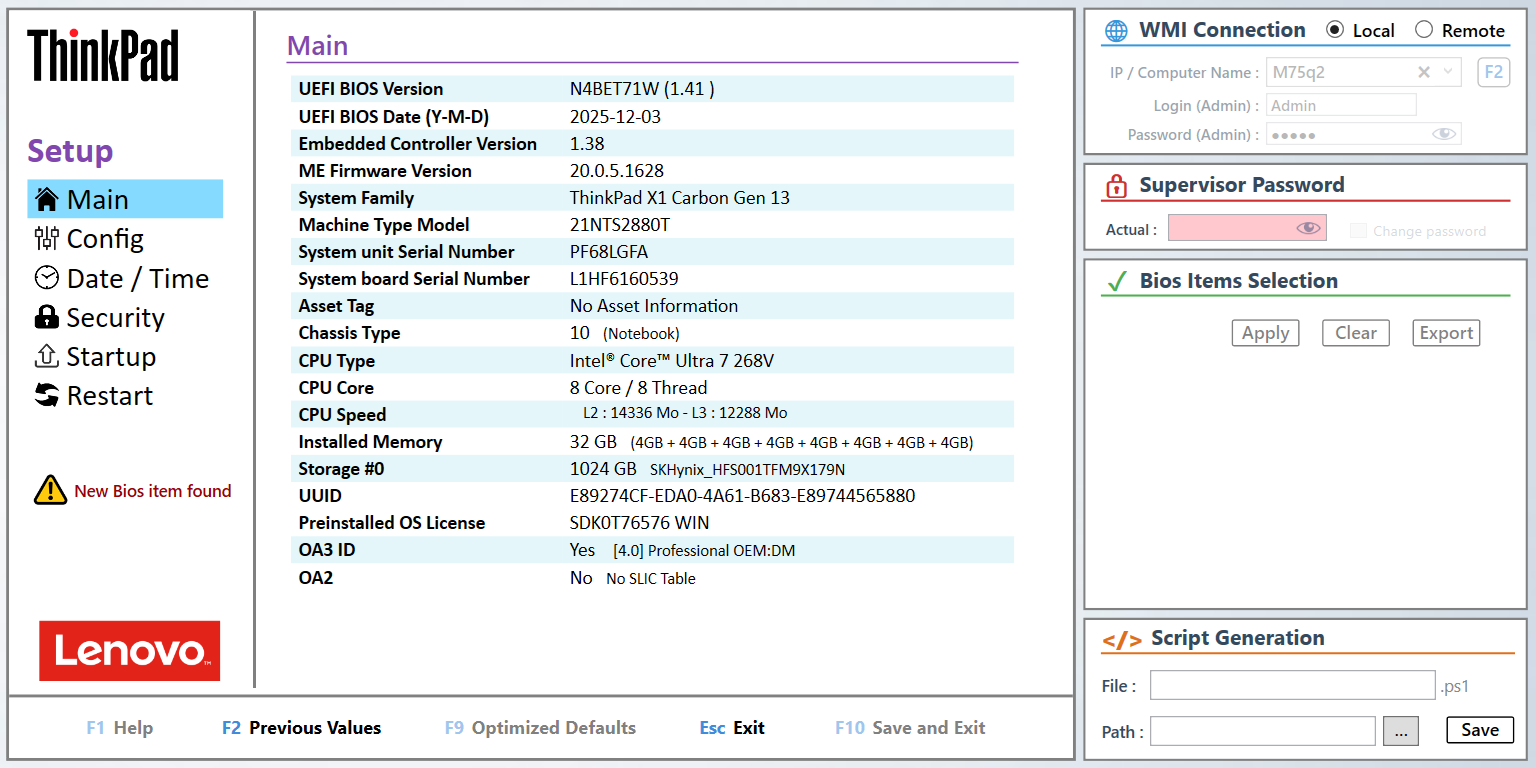
Center area - Content
Displays the content of the selected section. The Main page shows detailed system information. The other sections allow browsing and selecting Bios items.
Right panel - Controls
Contains the functional zones: WMI Connection, Supervisor Password, Bios Items actions, and Script Generation.
BIOS Items
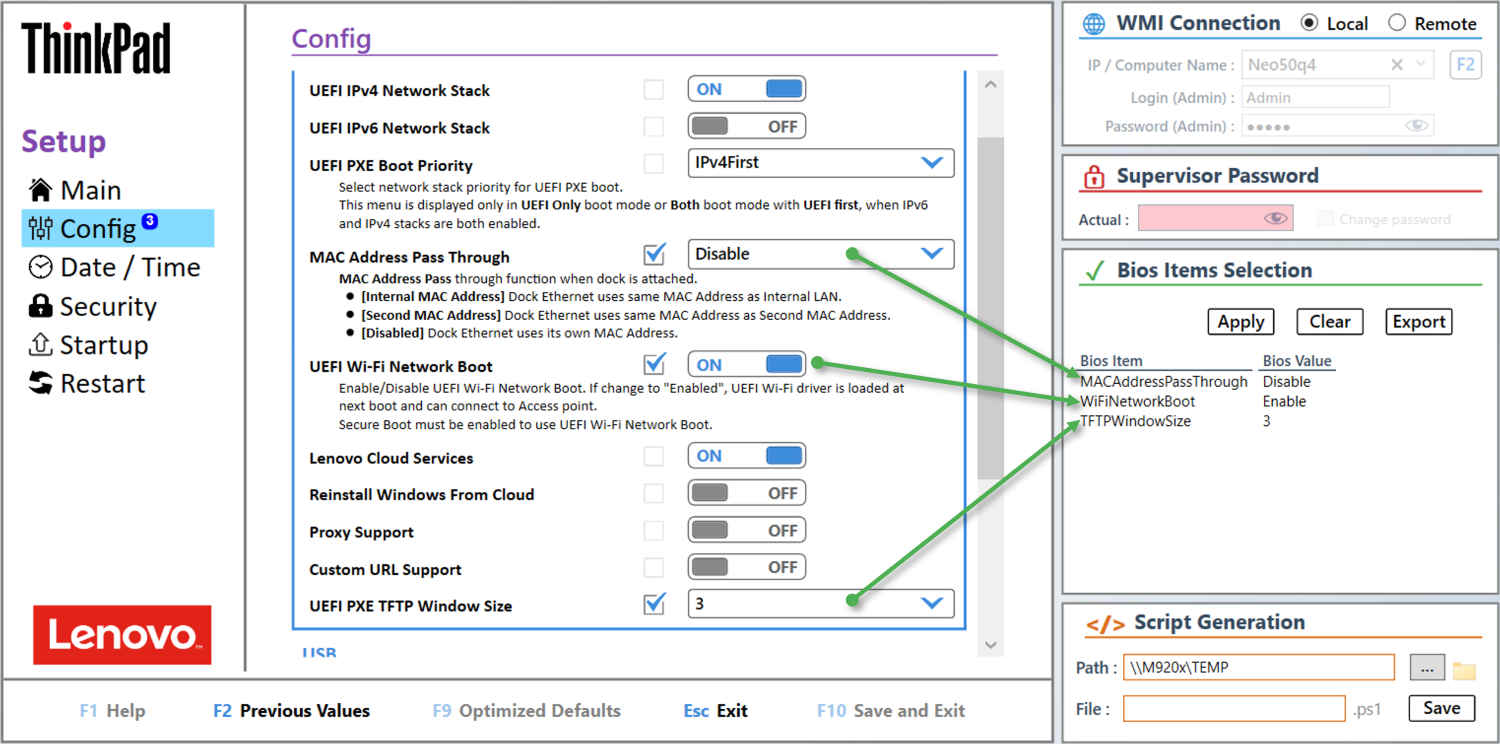
Each BIOS section displays the available items for the connected device. Items may appear as a toggle switch (ON/OFF) or a dropdown list, reflecting the current value read from the machine.
Reading items
Click on an item name to display its associated help text, describing the purpose of the setting and its possible values.
Selecting and changing items
Check the checkbox next to an item to select it, then choose the desired value. Selected items appear in the Bios Items Selection list on the right panel, showing the item name and the new value to apply. A badge on the section tab indicates the number of items currently selected in that section.
Applying changes
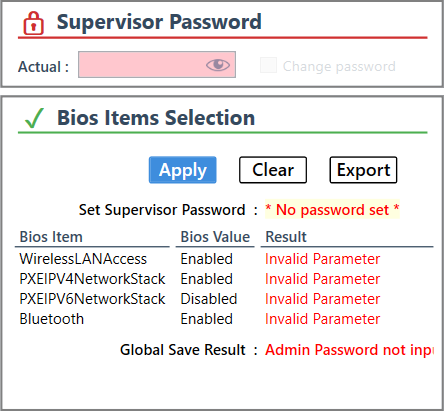
Once your selection is complete, click the Apply button. If a Supervisor Password is set on the device, the Supervisor Password field is highlighted and must be filled in before applying.
Changes are written to the BIOS but take effect only after the computer is restarted.

After clicking Apply, the result of each operation is displayed directly in the Bios Items Selection area, next to each item. A Success status confirms the setting was accepted by the BIOS. The overall save result and supervisor password operation are also confirmed at the bottom of the list.
The Export button saves all selected items and their values to a text file. The exported file includes the machine identification (System Family, MTM, Serial Number, BIOS version and date), the list of modifications, and a timestamp with the PowerBios version used. This file can serve as a test plan, a configuration record, or deployment documentation.
The exported file is automatically named using the date and the machine type model, for example: BiosTestPlan_20260419_21NT.txt
The Startup section displays the boot priority order of the connected device and allows reordering it visually.
Boot priority order
The left column shows the current boot sequence. Devices can be reordered by drag and drop. To remove a device from the boot order, drop it onto the Drop here to exclude item zone at the bottom, or click the cross icon on the item itself.
Click the blue arrow to revert the boot order list back to the previously saved values.
Adding devices
The right side lists all available boot devices, split into two groups: Main Boot Device items and Other Boot Device items. Click any device to add it to the boot priority order.
Current value
The full boot order string is displayed at the top of the section, reflecting the actual value as stored in the BIOS.
When selected, changes to the boot order are applied using the Apply button in the Bios Items Selection panel, and take effect after the computer is restarted.
The Supervisor Password zone is enabled automatically when a Supervisor Password is detected on the target device. When active, the password must be provided before applying any changes.
An incorrect or missing Supervisor Password will cause the apply operation to fail.
Most BIOS settings can be modified even without a Supervisor Password. However, some security-related settings can only be changed when a Supervisor Password exists. For example, the following items cannot be switched from Enable to Disable without one:
PowerBios supports Supervisor Password handling for both older ThinkPad models using the Legacy ascii,US syntaxe and newer devices using the advanced Lenovo_WmiOpcodeInterface WMI class, which supports complex passwords. The appropriate method is detected automatically at runtime.
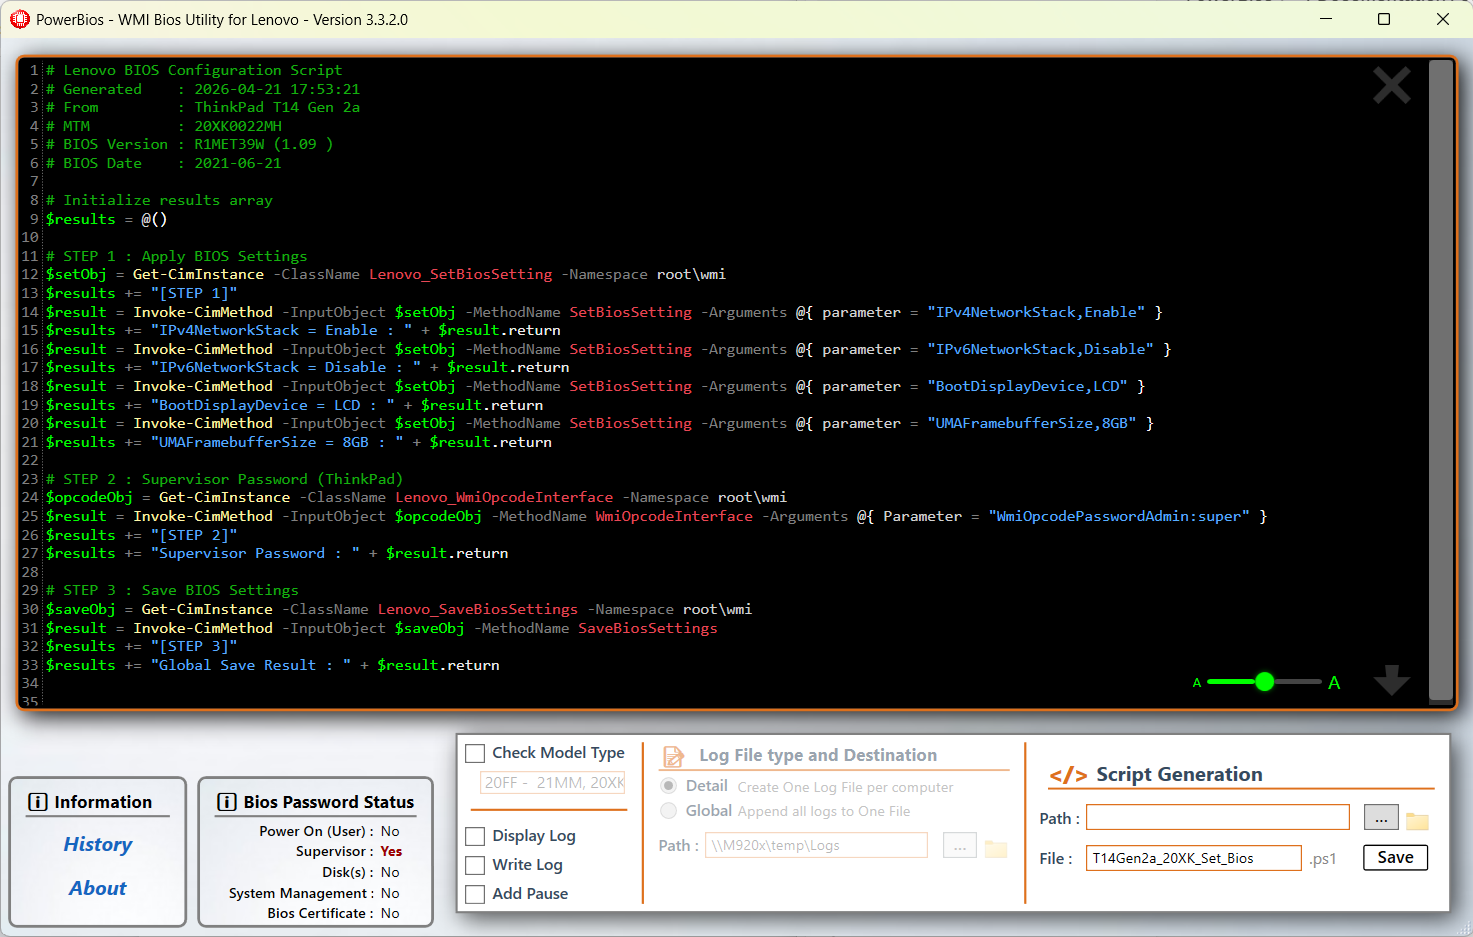
The Script Generator builds a ready-to-deploy PowerShell script based on the BIOS items currently selected. The generated script can be saved as a .ps1 file and executed on any compatible Lenovo device.
Generated script
The script is displayed in real time in the editor area. It includes a header with the generation date, source machine, MTM and BIOS version, followed by three steps:
The font size in the editor can be adjusted using the slider at the bottom right.
Script options
Saving the script
Set the destination path and file name, then click Save to export the script as a .ps1 file.
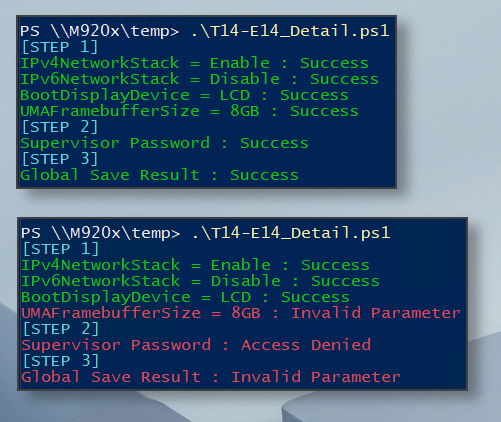
When the Display Log option is enabled, the script outputs the result of each operation directly in the PowerShell console as it runs.
Each step is clearly identified, and every BIOS item shows its result inline. A successful execution confirms all settings were applied and saved correctly.
If an error occurs, the affected item reports its specific issue - for example Invalid Parameter if a value is not accepted by the BIOS, or Access Denied if the Supervisor Password is missing or incorrect. The global save result at the end reflects the overall outcome.

When Write Log is enabled with the Detail option, the script generates one individual log file per computer. Only the destination folder needs to be specified - the log files are created automatically, named after the machine using the following format:
MTM_MachineName_YYYY-MM-DD_HH-MM.log
For example: 20XK_T14-2_2026-04-21_17-49.log
Each log file contains the machine identification (name, serial number, MTM, BIOS version and date), followed by the result of each step, item by item.
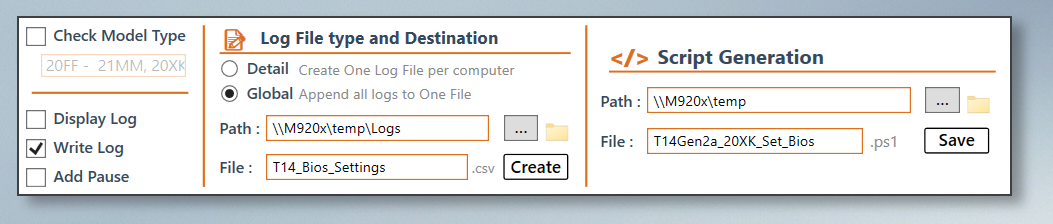
To set up a Global log, start by specifying the destination folder and the file name for the CSV file, then click Create
This initializes the CSV file and fixes the path that will be embedded in the generated PowerShell script. Then set the destination path and file name for the .ps1 script itself, and click Save to generate it.
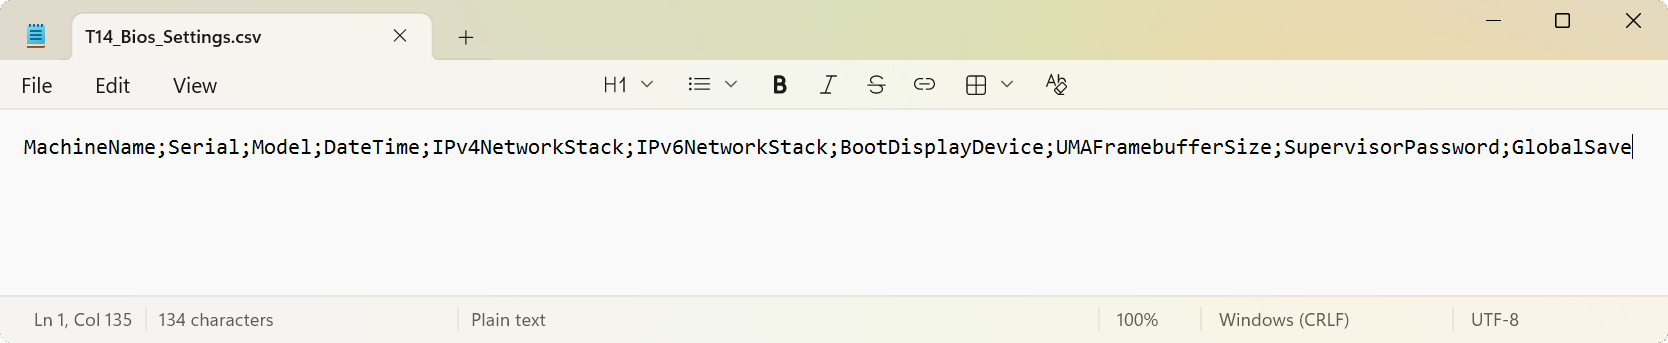
The CSV file is initialized with a header row containing the machine identification columns, one column per selected BIOS item, and a global result column. As deployments run across the fleet, each script execution automatically appends one row to the file.
When the CSV file is created, a companion PowerShell script is automatically generated alongside it, sharing the same base name with a _Monitor.ps1 suffix. Running this script in a PowerShell console displays incoming results in real time as machines complete their deployment, with color highlighting to quickly identify successes and failures.

When PowerBios detects BIOS items on the connected device that are not yet in its database, a warning indicator appears in the left panel and a dedicated tab is displayed.
Unknown items are fully functional - they can be selected, modified and included in a generated script, exactly like any known item.
The tab also displays a log with the machine identification (family, MTM, BIOS version and date) and the list of new items found. This information can be copied to the clipboard or saved as a .txt file to be sent to the PowerBios team at support@sometools.eu, so the new items can be added to a future update.
If you are using the latest version of PowerBios and encounter new items, sharing this information is greatly appreciated.
Questions, feedback, bug reports.
Join the SomeTools group| Choice | Version | Architecture | Link |
|---|---|---|---|
| Microsoft Store | 3.3.1.0 | x64 / ARM64 |

|
| Standalone | 3.3.3.0 | x64 | |
| Standalone | 3.3.3.0 | ARM64 | |
|
winget.exe

|
3.3.1.0 | winget.exe install --name powerbios --source msstore |
|